Caulking Tips: Make Your Job Easier and Last Longer

By Sashco.
We won’t belabor prep. You know to clean the area where the caulk will be applied – that’s a must. Now to the tools and action.
Cutting the Nozzle
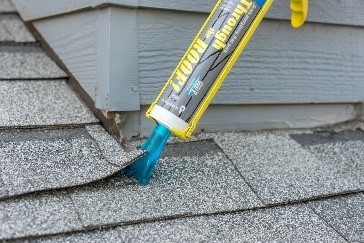
Think of the nozzle on your cartridge as a tool. It is a tool you shape. It is best to lay the nozzle on a solid surface and cut at a 450 angle. This is especially true when you are caulking a corner or 900 joint. Why the solid surface? First, it is safer than waving the cartridge in the air as you slice the nozzle channeling your inner samurai. Second, it ensures a clean cut that doesn’t leave bits of plastic that will drag through your bead.
That angle you cut, 450, is also your optimum ‘angle of attack’ when you start the application. The goal is to hold the caulk gun so the cut of the nozzle runs parallel to the joint surface. In other words, whatever angle you cut (even if not 450) should be the same angle the caulk gun and cartridge approach the joint.
Play with the Gun Angle
And test the outcome yourself. Hold the gun higher than your cut angle and your bead will be too concave and excess caulk will squeeze out on the sides as you draw it along. That’s a mess to clean up.
Put the angle too low and you’re likely to get bumps and splurges and a fatter bead than you need that isn’t well pressed against the surface. Now you have a time consuming ‘tooling’ job smoothing out the lumps and making sure the bead is in good contact with the substrate.
What does ‘just right’ do for you? Your nozzle will lay down a bead that just fills the joint with no overspill. And it will press the caulk against the surface giving you good contact to ensure adhesion. A well-run bead often does not need to be tooled.
Tooling When it’s Needed
And it will be, especially when aesthetics are important. Whether you get gaps between trigger pulls or lumps when your speed doesn’t quite match the caulk being extruded, or you suspect there isn’t good contact with the substrate, tooling will be needed. This is where people often make things more difficult than they need to be.
Tooling is an art. Not a difficult art, but an art. Most use their finger for this art and that is OK. The upside is your finger is convenient and usually with you. The downside is your finger is the wrong shape (round) and we tend to use it like a scraper.
The game here is to leave the caulk you just laid down, in the joint. Many people will tool the bead by pressing firmly as they run their finger along removing caulk from the joint. Where is the caulk now? You guessed it, on their finger!
This creates several issues. First, what do you do with all that caulk on your finger? Of course, since the rag blew off the roof you scrape it on your pants. Nice look! There would be fewer caulking failures if the caulking that normally ends up on rags and clothes stayed in the joint.
Second, tooling with a ‘heavy’ touch spreads excess caulking onto the sides of the joint where it isn’t supposed to be. But the worst of it is that it leaves a 1/8” or smaller bead in the joint. In caulking terms that “micro-bead” is a failure waiting to happen. So promise yourself: no micro-beads.
There’s a better way to tool. First, its best to have what we call ‘tooling juice’ at hand. Almost all caulks can be tooled using either soapy water or, even more convenient, a spray bottle of clear window cleaner. The idea is to glide gently, yes gently, over the bead to do any remaining shaping or pressing-in needed. You should have almost no caulk coming off on your finger. Then no one will see it when you wipe it on your pants.
The ideal finished bead, for most joints, is 3/8” wide. Even a ¼” bead can be iffy in terms of performance. You are asking that bead to adhere and absorb building movement for years. You need to leave enough mass to get that job done.
In a Few Words
Cutting the cartridge nozzle and holding the gun at the proper angle will put the right amount of caulk in the joint, save most of the tooling work, increase caulk performance, and get you home faster. What’s not to like?
How About that Round Bead?
Many times you’re dealing with the need for a flat bead. That happens often in roofing in lap joints, butt joints, and sandwich joints (like tabbing down shingles). Though these recommendations above can work for those joints there is an easier way. It’s the newly introduced Cobra Lap Joint Nozzle. But that is for a future story.
Request your FREE Cobra nozzle.
Visit our website today to learn more about our products.


Comments
Leave a Reply
Have an account? Login to leave a comment!
Sign In