The Living Roof Series: Intensive Green Roofs
By Molly Nelson, RCS Intern.
A comprehensive look at intensive green roofs including: pre-installation considerations, installation methods and post-installation maintenance.
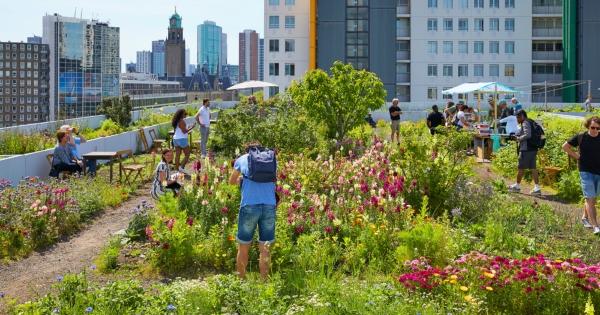
There are multiple types of green roofs to consider as a roofing professional when working with a customer to install a living roof. The following information focuses on intensive green roofs, which are characterized by a soil depth greater than six inches, their ability to support all types of plants and the accessibility of the roofs. In Getting to Know Green Roofs, the first article of this series, we shared that these roofs are used for single family, multi-family residential buildings or commercial buildings, and allow for walking/recreation and other additional uses. Additionally, an intensive green roof is a great opportunity for stormwater management practices, improving building’s energy efficiency and reducing urban heat island effects.
This article is intended to give a comprehensive view of what goes into designing, building and maintaining an intensive green roof. Each section will highlight important considerations for every stage of the process to provide a better understanding.
Pre-installation considerations
The customer→ Location→ Timing→ Roof slope→ Site analysis→ Structural capacity→ Cost
The customer
An intensive green roof can be applied to both residential and commercial buildings. This type of living roof has the ability to support a range of personal gardens to a full-scale public park or urban farm.
Location
Where the intensive green roof is being applied is an important part of the process to consider. Not only is it essential to determine if the region where the build is taking place is compatible for a green roof to thrive, the orientation of the building and weather play a key role in the decision. Things to consider are the roof’s orientation to the sun for sun exposure, if there is protection from the wind, and roof height in comparison to other buildings (for shade).
Intensive green roofs can be installed in any region of the United States and the world; however, certain modifications will need to be applied for regions with more extreme climates. For example, a roof in a region with harsh winters like the Midwest or Northeast will require more hardy plants that can withstand extreme cold temperatures. On the opposite spectrum, intensive green roofs in areas more prone to drought and hot temperatures will require an irrigation system to support the plants during the months where little to no rain is present.
Timing
Due to the nature of the plants that are used for intensive green roofs, the installation/planting window is limited to, but not exclusive to, spring and summer seasons. The numerous plant varieties of perennials, grasses, bushes and trees need enough time to acclimate to the roof without being shocked, which typically happens in the winter months. Installation in the spring and summer can also help make the whole installation process easier by avoiding difficult working conditions.
Roof slope
For an intensive green roof, the slope range for installation is 0:12-1:12 pitch. The lower pitch is due to the greater weight of an intensive green roof and the deeper growing medium depth. The steeper the slope of the roof, the more need there is for a reinforcing system and soil retention systems.
An additional consideration when evaluating roof slope for your living roof application is the orientation of the slope. If your slope is south facing, the roof will receive more direct sunlight and this requires full-sun plants and possibly an irrigation system. North-facing slopes receive less sunlight and therefore shade-loving plants will thrive on this slope. Finally, plants on the ridgeline will receive less water from rainfall than plants located on the eaves, so choose plants accordingly.
Site analysis
A site analysis will help assess anything that will impact the roof design or installation. Some factors included in a site analysis are (but not limited to):
-
Type and condition of existing roof deck and waterproofing
-
Dead and live load structural capacity
-
Views from the roof (especially for intensive green roofs with recreation goals)
-
Access points of the roof
-
Roof drain locations and types
-
Water storage and supply (important for irrigation system)
-
Sources of power for irrigation or installation
-
Building code and insurance requirements
Installation methods
Structural Capacity→ Cost→ Waterproof Membrane→ Root barrier→ Insulation layer (OPTIONAL)→ Protection Layer→ Drainage Layer→ Filter Mat→ Growing Media→ Plants
Structural capacity
Calculating structural capacity of your building for the installation of an intensive green roof is the most important step during the pre-installation evaluation of your project. The weight-bearing capacity of the building is calculated by a structural engineer prior to installation. This is to determine not only the ability of the roof to support the weight of the intensive green roof, but the weight of additional water that can be stored in the green roof. The typical weight of an intensive green roof can range from 35 - 300 pounds per square foot. An intensive green roof will have the heaviest weight load of all the living roof options.
Cost
The cost of the installation of an intensive green roof can vary depending on how much extra reinforcement, insulation and waterproofing is needed to prepare the roof deck. Without extra expenses, an intensive green roof costs an average of $25 per square foot for installation and $0.75 - $1.50 per square foot for maintenance. Incorporating the green roof into the design at the beginning of a new build can decrease the cost for structural evaluation.
A full breakdown of all costs for the pre-installation, installation and maintenance can be found here.
Waterproof membrane
As with all types of living roofs, the waterproof membrane is the most important component of installation for an intensive green roof. It is crucial to choose a durable and high-quality waterproofing assembly as it is difficult and costly to repair a waterproof membrane that is underneath the other green roof layers. The waterproof membrane protects the roof deck from any amount of water that could penetrate the deck and damage the building. It is important that all parties involved in the installation of a living roof understand the warranty of the product being used, as well as installation restrictions.
-
Built-up/modified bitumen
-
Rubberized asphalt
-
Thermoplastic membranes/polyvinyl chloride (PVC)
-
Thermoplastic Olefin (TPO)
-
Ethylene propylene diene terpolymer/monomer (EPDM)
All single-ply membranes for the waterproof membrane of a living roof should be at least 60 mil in thickness to ensure puncture resistance from roots and increase the lifespan of the roof.
A full, comprehensive look at waterproof membrane selection, application and principles can be found here.
Root barrier
The root barrier is the defense system that prevents roots from damaging the waterproof membrane. Applied directly on top of the waterproof membrane, the root barrier is a durable plastic membrane that is rolled out on top of the waterproof membrane and cut to the appropriate size of the roof. If needed, the sheets of plastic can be overlapped and taped together.
Insulation layer (OPTIONAL)
Application of the insulation layer is not required for every intensive green roof installation, especially if the insulation is part of the roof assembly or below the roof deck. However, in states that reach extreme-freezing temperatures, an insulation layer to protect the microclimate of the root system for vegetation on living roofs is advised. An insulation layer above the root barrier will be approximately two to three inches thick.
Protection layer
For most intensive roof applications, a protection layer is applied to help with load strains from the deep soil and heavier, bigger root systems. This membrane is water-permeable and consists of a synthetic fiber, puncture-resistant material.
Drainage layer
One of the main goals of a living roof is to retain stormwater to reduce runoff, however, excess water that cannot be stored within the system needs a way to be drained from the area. A drainage layer is applied with or without the insulation layer and will be applied as a network of boards/mats, pipes and drains to allow excess water that could cause pooling and damage the waterproof membrane to be discharged from the roof. This layer is where most of the post-installation maintenance will need to focus as debris build-up can cause further damage to the roof.
Sloped roofs may only need a basic gutter system due to the advantage of gravity, but flat roofs will require a more intricate drainage system design. Once any drains or other features are applied, flashing is absolutely necessary to seal the interruptions (this is where the majority of leaks are found on a living roof).
Filter mat
A filter mat or filter layer is simply a lightweight and rot-proof material that protects the drainage layer from any particles or debris from the growing medium that would inhibit the drainage layer from properly functioning. A drainage mat has a dimpled polystyrene core on the top which prevents roots from infiltrating the rest of the system while still allowing for water and air flow. The material is a lightweight fabric that is either a landscape fabric, polyester fiber matting or polypropylene-polyethylene matting.
Growing media
Now that all of the protection layers have been installed, the growing media can be added. For an intensive green roof, the depth of the growing media will be greater than six inches. The greater depth allows for more storm water retention and prevents heat from moving down into the building, however the overall weight of the roof will be larger. A common technique for applying the growing media is to lay all of the bags containing the soil across the entire roof and cut them open one by one to ensure uniform application.
The type of substrate that is used depends on the design plan of the roof and compatibility with the types of plants that are needed. Commonly, all living roofs use a soil media that is a soil mixture of inorganic materials of crushed clay and perlite.
Characteristics of intensive green roof growing media:
-
Lightweight
-
High percolation rates
-
Lower nutrient levels
-
High porosity
-
Greater longevity
-
Compatible with drought tolerant plants
-
High in mineral aggregates
-
Low in organic material
Plants
The last step of the installation process is to finally plant the greenery that will be the face of the green roof. Intensive green roofs will contain perennials, grasses, shrubs and trees for the vegetation layer, all of which are durable and long lasting if maintained correctly. For an average living roof, it takes up to three years for the plants to fully establish and mature. It is beneficial to consult with a landscape specialist for the selection of plants for the living roof.
Additional considerations:
-
Expected size and height of mature plants
-
Vegetated free zones on the roof
-
Pathway placement
-
Areas with high wind lift
-
Placement of a firebreak
Post-installation maintenance
For an intensive green roof to be successful long term, regular maintenance is critical. More maintenance is typically required for an intensive green roof than other living roof styles. During the first two years after installation, more in-depth care is required while the plants are still establishing. Also, during the beginning of the living roof’s lifespan, frequent monitoring of the drainage system will help prevent leaks or other damage to the building.
Spring and summer months require more frequent visits for maintenance with a minimum of twice a month. Fall and winter require less attention, but routine inspection and maintenance is recommended to ensure everything is working properly and no damage has occurred. In fall, three-to-four-week intervals between maintenance are acceptable and in winter, expect about six weeks between visits.
Maintenance visits include, but are not limited to: drain inspection, weeding, watering (if necessary), pruning, fertilizing, replacing dead plants, removing debris build-up, clearing pathways, monitoring crops (for rooftop gardens/agriculture) and monitoring irrigation systems and drainage pathways.















Comments
Leave a Reply
Have an account? Login to leave a comment!
Sign In