Where Plumbing Meets Roofing - Specifying TUBOS Vent Pipe Extensions

By Kevin Morris, TUBOS.
A plumbing vent pipe is a very important part of the building’s drainage system and code requires that pipes extend vertically a minimum of six inches above the roof.
Plumbing Requirements
A plumbing vent pipe is part of the drainage system. It services two functions, allows the building’s plumbing system to properly drain and enables sewer gases to flow outside. Drainage happens because the vent pipe allows air in and stops a vacuum from being created at fixtures. Sewer gases are part of waste and a safe standard of practice is to vent them outside to the roof. This typically is done so dangerous odors cannot affect building inhabitants. Some roofs will have one plumbing vent pipe that connects to the building’s entire plumbing system and other buildings have numerous plumbing vents. Vent pipe materials range from cast iron, galvanized, copper, acrylonitrile butadiene styrene (ABS and polyvinyl chloride (PVC).
The International Plumbing Code (IPC) requires plumbing vent pipes to extend vertically at least 152 mm (6 in) above a roof, per section 905.5, “Vent Connections and Grades.” Additionally, vent pipes must be at least 305 mm (12 in.) away from a vertical surface. In locations known for snow, the vent pipe needs to be at least 51 mm (12 in.) in diameter and 305 mm inside an insulated area of a building before extending through the roof. Vents in these locations also should extend 610 mm (24 in.) above a roof.
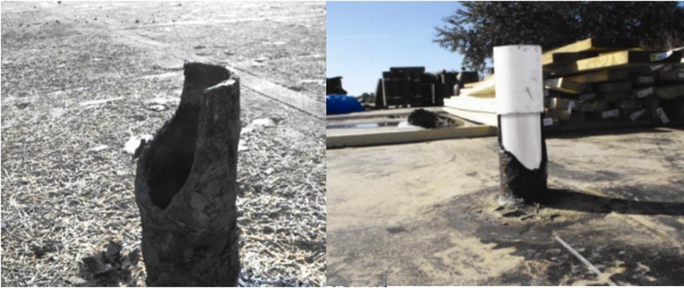
In addition to following codes and standards, design/construction professionals need to keep their eyes open for features unique to each project, Contractors can encounter cracked, missing, or covered-up vent pipes. Particularly during the re-roof process, it is important to inspect the system for trouble spots or installation errors of the previous roof system. Errors must be corrected before vent pipe extensions are installed.
Extension Methods
Traditional options to meet the code requirements for vent pipe extensions—a stainless steel method and a ‘no-hub’ method. The first option begins with a stainless-steel sleeve inserted into the existing vent pipe. Caulk is applied to the top of the existing pipe, and then a new PVC cover is placed over the stainless steel. The exposed portion of the stainless steel is cut, so notches fold down over the PVC. This application is good for lead boot applications. It takes about 30 minutes to install, and material cost about $18.
The second option is to attach a no-hub coupling to the existing vent pipe and tighten to 60 inch-pounds of torque—this is essential to prevent leaks. Next, PVC pipe is measured and cut to the specified height, and the PVC is attached to the no-hub at 60 inch-pounds of toque. A larger lead boot (typically an additional $10) is required to fit over the PVC pipe/no-hub, and the excess lead is stuffed into the smaller PVC pipe. This method typically takes 15 minutes to install, and the material costs about $22.
A newer third option is available, using proprietary technologies. One example is a TUBOS vent pipe extension system available in 2-, 3-, and 4-inch widths to match standard vent pipe sizes. Installation begins by selecting the appropriate-sized component and inserting into the existing plumbing vent pipe; it is then marked to the code-required height and cut. Once the extension and vent pipe are cleaned of any dirt, dust, or debris, the extension is sealed in place with adhesive and/or sealant applied. This also stops methane gas from leaking out. An approved pipe flashing is then installed, following the recommendations of the manufacturer.
To help reduce waste, each of the components has a 6-inch-long joint splice-sleeve insert at each tapered end, meaning it can be used for two applications. In addition to reducing waste, this design can save the construction team money in term of material and labor time. This method takes 3-5 minutes and costs on average $17.50.
There are many tools available to make the connection between plumbing and roofing easy, efficient, and effective. When to use a specific method could depend on specific area’s practices and habits. Not all habits are good ones, so contractors and specifiers are urged to consider all the options to meet codes and standards.
Learn more about TUBOS vent pipe extensions.


Comments
Leave a Reply
Have an account? Login to leave a comment!
Sign In