Seamless connections: Attaching a Starlink satellite dish to a metal roof

By Dani Sheehan.
With this dependable mounting combination, attaching a satellite dish to the roof is quick, easy and secure for a solution capable of handling anything the weather throws at it.
Living in rural areas can offer a quiet lifestyle, but the challenge of staying connected has been a constant struggle. Starlink has emerged as a key internet provider for people and communities living in remote locations. However, the key to maximizing its potential is in proper mounting and placement of the satellite dish. S-5!® offers advice on the best way to attach a Starlink satellite dish to a standing seam metal roof.
In places where high winds are common or tree coverage obstructs the view of the sky, choosing the right location for the satellite dish is crucial. The Starlink app helps determine the optimal setup location, which often is the center of the roof.
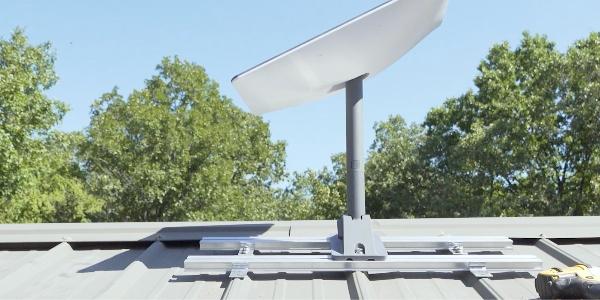
S-5! provides a range of products compatible with Starlink’s bases, and the GRIPPERFIX® Utility Mounting System with exposed fixed tabs proves to be a simple yet secure choice. The gripper fix system, equipped with self-piercing fasteners, ensures optimal holding strength and wind resistance. Whether the roof is corrugated or trapezoidal, the gripper fix system accommodates various profiles, making it a versatile solution.
To install, place M8 bolts in the center of the gripper fixed struts, attaching the Starlink base and securing the exposed fix tabs. The self-piercing fasteners, with EPDM washers, create a double weather seal, enhancing durability. For roofs with unknown gauges, using eight tabs ensures optimal holding strength and wind resistance. You can also adjust the height by adding more M8 bolts and repeating the installation steps. A taller setup is likely going to yield improved performance, especially in areas with considerable tree coverage. The video below shows this installation process in more detail.
Once the dish is connected to the router through the attic, the calibration process begins. To improve wire management, you can use the remaining gripper fixed struts and cable clips from the Starlink kit to create a tidy and organized appearance. When the Starlink satellite dish is properly installed to a standing seam metal roof, your customers will see increased performance, bringing reliable internet connectivity to their serene home.
Learn more about S-5! in their Coffee Shop Directory or visit www.S-5.com.

About Dani
Dani is a writer for The Coffee Shops and AskARoofer™. When she's not writing or researching, she's teaching yoga classes or exploring new hiking trails.
Recommended For You

6 CRM Roofing Software Strategies to Increase Productivity
Read More ...
Rufus the roofing robot
Read More ...
Do More with Online Contractor Task Management
Read More ...


Comments
Leave a Reply
Have an account? Login to leave a comment!
Sign In