.jpg")


Roofing Roadtrips With Heidi - The Future Is Bright
Learn More


copper barrel dormers
« Back To Roofers Talk
copperman


 Just finished these this week. I made all the panels in the shop
Also I salvaged the copper off the dormers to do my bay window on my house. I will take pics later
Just finished these this week. I made all the panels in the shop
Also I salvaged the copper off the dormers to do my bay window on my house. I will take pics later

egg
Woody, I'm almost fearful of attempting an interpretation. I think (or let's say am inclined to think) that they are discriminating on the usage based primarily on heat and secondarily on thickness. The spunbonded product (Triflex) we can assume (?) doesn't wear well under the hotter metals and doesn't meet the req. for ice dams anyway. The I&W and Select will melt down in the S/W. The Basik exception confuses me. Why not the Basik over wood substrate... The I&W is thicker than the Select so gets over more testing hurdles (?) The Ultra is a different beast altogether because the HDPE film is not sitting on a modbit back, so I get that. The Basik is confusing me. I suspect they aren't distinguishing between geographic types in any comprehensive way. Needs more research. Freeze/thaw cycles, heat transference, (ice damming as a separate issue) I honestly can't answer your excellent question and wish I could. Too tired to investigate these days but later. Let me know if you find out before I do.
tinner666
I know. I should have said it didn't relate to your job. I was just giving out some general info for the others here. :)
copperman
tinner this is from Copper .org. Expansion and contraction are a function of temperature change, material properties, and the dimensions of the material. The amount of movement can be calculated with the following general formula:
dL = L x E x dT
Where:
dL = change in length (expansion or contraction)
L = Length of copper material
E = coefficient of linear expansion of copper = 0.0000098 per degree Fahrenheit
dT = temperature change in degrees Fahrenheit
Calculation of movement is rarely required in short roof pan construction, since the details shown here can accommodate thermal movement of short pans. since the pans are only 17 inches wide and 60 inches long there will not be a lot of movement.
tinner666
Ok. I thought the cleats were tight against the panels. The pic was misleading. After seeing some rise in the center of tightly cleated panels some years back, I learned to give them room to move sideways and I just get paranoid sometimes.
Nice looking job.
(BTW, for the others reading this, I leave 1/8" to 3/16" gap in the cleats/panels depending on temps since we can go from 6 below to 109 above here. !/2" at drip edge. This gives me 1" of expansion per 8 courses this way, and doesn't just rely on an expansion joint for every 50' of roofing across a building. :))
egg
You would be a credit to any team you worked on, so don't get me wrong when I nitpick. The copper is gorgeous, no question about it.
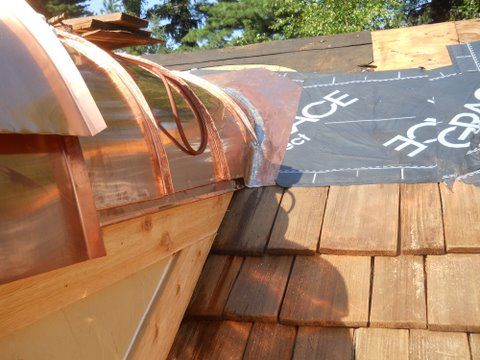
The shake side of the upper portion has a little issue your boss doesn't seem to get.

Ice and Water shield is cheap enough, but Select?
(It has to be showing between the shakes)

As good as you are I would have made him let you solder on back-folded steps on the 3 courses of ice dam shakes curving around the flange. When it gives up the ghost, that's where it will blow out. The copper will still be functioning there long after we are all dead but water will be soaking under those shake valley curves and the Select between the shakes will start burning out as of now.
Gotta say it again though: beautiful work on your part.
copperman
Tinner I use a stretcher on the seams after the pan is bent. It take about 30 min. a pan. They were 60 inches long. I made a template of the arch and kept checking as I stretched the seams. They have to be near perfect for the install to work. The clamps are a must to hold it in place. There is plenty of room for expansion.
tinner666
Nice work. How did you form the standing seam.curves? BTW, I never cleat my panels until I finish seaming. When letting the vise tongs off, they relax almost 1/4", so I release then cleat.
Rocky, they'll stain within a day anyway. CLients know this and generally want them turning to a patina asap. I have one I'll finally be installing this week. The panels were tinned in Apr, and already turning black. We haven't been able to get 3 clear days since Apr. and the widow walk has to be removed and rebuilt. When using liquid flux, the heat creates a fine mist of spray that tarnshes the panels as much as 18" from any seam. Since panels are never more than 24" by 18" anyway, the whole roof patinas fast. Same thing happens when tinning. I use two vats. One is a 30" made of aluminum for the liquid flux, the other is 30" x 1-1/2" x1-1/2" for solder. I dip in flux, then into molten solder, keeping it there until the crust that forms at the undipped area sloths off for a smooth tin with no lumpiness.
copperman
the seam i referred to only has a 1/4 inch pocket
CIAK
Copper Pittsburgh seam you referenced is a pocket seam? The Pittsburgh seams I'm familiar with are Lock seam. I can't imagine that system leaking or needing caulk. B) :) :) B) Deep Down In Florida Where The Sun Shines Damn Near Every Day

kage
That Sir is Awesome work!!
copperman
Ciak the old roof was put together with a Pittsburgh seam used in duct work and caulked. It was face nailed to hold it together. They were 18 years old. I'm surprised they lasted that long. In this development there are about 30 more to do in the upcoming years.Yes it is blinding. In fact I get "snow blindness" by the end of the day and thats with the darkest sun glasses I can find. Tinner knows what I'm talking about there I'm sure. The ice & Water shield was the bosses idea. This job is in the heart of the lake Erie snow belt. These dormers are completely cover in snow in the winter.


CIAK
Copper Why did the copper need R/R? It appears it had a copper roof to begin with. Nice looking work. It must be blinding working on copper in full sunlight. B) :) :) B) Deep Down In Florida Where The Sun Shines Damn Near Every Day
copperman
The spark arrestor's are stainless steel. As far as the stains some are from the flux and some from sweat. It was 90 degrees the days I did them and 100% humidity

Rockydog
copperman, your domes look great as well as your chimney cap. couple queations. Now granted, it probably can't be seen from the ground, but, what is with all the stains on the copper domes? Also Your spark arrestor's look to be galvanized and they are connected to the copper cap. what did you use to seperate the 2 products and what kind of fasteners did you use to connect the 2.
copperman
I also removed lick and stick stone off this chimney and framed it out and put a copper top on it


