


Can you Measure a Roof with Augmented Reality?

The answer to this question is a resounding ‘Yes.’ You CAN measure a roof using AR.
By Luke Hansen, CompanyCam.
I never imagined that it would be possible to stand on a roof and measure it with your phone, let alone that the measurement would be accurate enough to write a bid with, but in the new world of augmented reality, it’s not only a possibility, it’s a reality.
We’ve spent months building out this new augmented reality (AR) feature for CompanyCam and are extremely proud of the way it’s turned out—and we aren’t done yet.
When we started building our AR feature, there was a lot of ground to cover. In order to create a fully functioning AR kit, you’ve got to know about computer vision, accelerometers, feature points, what your phone’s camera can pick up on, and so much more tech nonsense that a lot of us don’t fully understand. Lucky for us we have Dr. Dan, our in-house mathematician and certified genius, to guide the way.
We’ll spare you the monotonous details of everything that went into creating AR, and skip to the part you care about. We simplified the process for you down to just 4 easy steps.
Let’s break it down.
First things first, check the pitch of the roof. Another thing we’ve made super simple for you to do with our built-in AR pitch gauge. So, step 1: get up on the roof and measure the pitch.
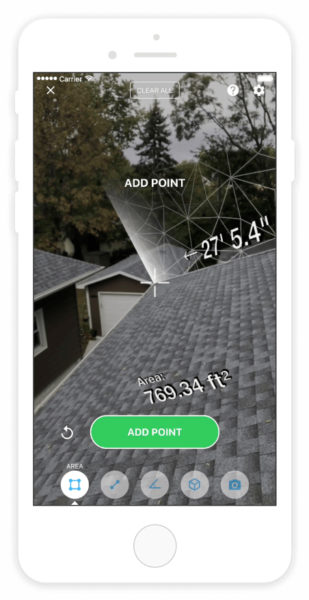
Here comes the fun part. You’re up on the roof, have the pitch measured, now it’s time to scan the surface. Shingles and AR work together beautifully. The texture and contrast of shingles makes scanning the surface and getting accurate measurements super easy. Step 2: scan the roof to establish your plane/surface.
Now it’s time to start plotting your feature points. Plotting feature points is crucial to getting the most accurate measurement possible, so we’ve got some tips on how to make sure you don’t f**k the whole thing up. Getting accurate measurements with AR is heavily reliant on standing as still as possible. So once you’ve scanned the roof and gotten the plane, start at one side and slowly rotate to get the points plotted. It’s easy to see how I did this in the video, so if this step isn’t super clear, check that out. So, step 3: don’t move your feet and plot your points as you rotate from one side to the other.
The distance between the feature points you plot will be measured and the area of the surface will be calculated for you. Unfortunately, we don’t have the functionality to add up all the sides of the roof—yet—so for now, you’ll have to use a regular old calculator to add up the area of all the sides you measured to get the full area. Repeat steps 2 and 3 for all sides of the roof and then, step 4: add up the areas of each side.
To show you guys how accurate this can be—when done right—we measured our Marketing Director, Kyle’s, roof with AR. I got up there, scanned the roof to get the plane, stood still while I plotted the feature points, and then added up the area of each side. Super simple, and when you take your time to do it right, super accurate. Kyle reshingled his roof a couple years ago and we went down and dug up the insurance paperwork to find what they had estimated the area to be. Insurance estimated 23.02 squares and CompanyCam estimated…22.96 squares!
Now, like I’ve said, when you do this correctly it can be incredibly useful. So here’s a quick reminder of what you should do to make sure you don’t mess it up:
- When you are scanning the surface to find the plane, wait until it turns green so you know you’ve gotten a good read and are ready to measure.
- When dropping your feature points, try to stand in the same place and only rotate your upper body to plot the points. AR works best when you stay in the same spot you started in.
This whole process of scanning the roof, plotting the points, and adding up the measurements took about 7 minutes and is a great way to quickly estimate projects without paying for additional services.
The best part about this whole thing? You can do it all directly through CompanyCam, meaning the photos you take, the measurements you get, and the estimates are all instantly synced back to your office and to your whole team. You can even create and share a gallery of the estimates with the customer so they can see exactly what you see.
Download CompanyCam here and try it out for 14 days, no card required.


Comments
Leave a Reply
Have an account? Login to leave a comment!
Sign In